Mi sayur rumpai laut Sabah

Mi sayur rumpai laut Sabah


PATRICIA menunjukkan produk mi sayur rumpai laut hasil penyelidikan saintis UMS.
 
 
MI sayur diperbuat daripada rumpai laut memang tidak asing kepada mereka yang menjaga kesihatan dan pengamal makanan berasaskan sayur (vegetarian) di negara seperti Jepun dan Filipina.
Mereka mengetahui faedah kesihatan daripada alga laut itu dan telah menghasilkannya sejak sekian lama. Kini, Universiti Malaysia Sabah (UMS) dengan inovasi sendiri telah menghasilkan mi yang boleh meningkatkan kandungan serat dalam diet kepada lebih 30 peratus berbanding mi biasa.
“Mi biasa hanya mengandungi kadar serat sekitar 0.5 peratus sahaja,” kata Pakar Sains Pemakanan UMS, Dr. Ismail Aswawi Kassim, Chan Pei Teng dan Norhafizah Ismail, yang memenangi anugerah perak pada Persidangan dan Pameran BioMalaysia 2010.
Produk berkenaan adalah hasil daripada penyelidikan mereka selama dua tahun yang mendapat tajaan daripada Kementerian Sains, Teknologi dan Inovasi (MOSTI).
Rumpai laut daripada jenis Red Kappaphycus alvarezii dan green Caulerpa lentillifera yang membiak dengan banyak di perairan Sabah terutama di pantai bahagian timur, dipilih untuk projek berkenaan berikutan kandungan kesihatan yang baik.
“Selain serat diet, rumpai laut ini juga kaya dengan sumber mineral, protein dan vitamin. Ia mengandungi jumlah lipid yang rendah dan jumlah Omega-3 yang mencukupi,” katanya.

GREEN CAULERPA LENTILLIFERA salah satu jenis rumpai laut yang digunakan dalam menghasilkan mi sayur.


Kajian yang dilakukan di peringkat antarabangsa mendapati bahawa Omega-3 sebagai asid lemak yang penting boleh membantu merendahkan trigliserida dan meningkatkan kolesterol HDL (kolesterol baik). Ia juga boleh bertindak sebagai antikogulen dan mengelakkan pembekuan darah.
Kajian juga menunjukkan bahawa Omega-3 boleh membantu merendahkan tekanan darah tinggi.
Pensyarah kanan Teknologi Makanan dan Bioproses di UMS, Patricia Matanjum berkata, mi sayur yang dihasilkan penyelidik universiti itu tidak mempunyai bahan penambah rasa atau pengawet.
Beliau yakin bahawa tarikan produk berkenaan terletak pada nilai antioksidanya yang tinggi.
“Antioksida seperti yang diketahui adalah baik untuk kesihatan yang berkaitan dengan jantung. Kajian kami menunjukkan bahawa kandungan antioksida di dalamnya meningkat selepas dididih. Mi berkenaan hendaklah dididih untuk selama lima hingga tujuh minit sebelum dimakan. Nutrien yang lain juga kekal stabil meskipun melalui suhu panas,” demikian menurut Matanjun. – Bernama

Ninja pantau keselamatan orang ramai....


Ninja pantau keselamatan orang ramai


SEORANG kanak-kanak melihat aksi ninja yang berkawal di Royal Tunbridge Wells di Kent baru-baru ini.
 
 
KENT, Britain - Seorang lelaki tidak dikenali lengkap berpakaian hitam seperti ninja digelar sebagai penyelamat kerana sering menghulurkan bantuan kepada orang awam di jalan-jalan sekitar Royal Tunbridge Wells di sini, lapor sebuah akhbar semalam.
Lelaki dipercayai berusia 25 tahun yang memakai topeng dengan pakaian seperti atlet judo itu memerhatikan jalan-jalan raya, menegur setiap kesalahan orang ramai, sekali gus menjadi hero kepada penduduk di bandar Kent.
Antara tugas yang dilakukan oleh ninja tersebut termasuk memulangkan semula kucing yang hilang kepada pemilik haiwan itu dan memberi amaran kepada para pemandu supaya meletakkan kenderaan mereka di kotak parkir yang ditetapkan bagi mengelak risiko disaman.
Dia juga membantu warga tua untuk melintas jalan sehingga membuatkan ramai penduduk yang cukup berterima kasih kepada ninja tersebut.
Ninja itu juga memuat turun gambar dan videonya di laman sosial Facebook dengan menyatakan bahawa dia ingin menegakkan keadilan di sekitar Kent.
"Ada segelintir orang di Facebook mendakwa saya sengaja mereka-reka cerita tentang ninja ini. Tetapi saya akui, sayalah ninja itu.
Polis Kent Barat mengaku pihaknya tidak menyedari kemunculan ninja tersebut.
Namun, ia memberi amaran kepada orang ramai supaya tidak menegakkan undang-undang dengan menggunakan pendekatan sendiri. - Agensi

Melamar menggunakan teka silang kata

Melamar menggunakan teka silang kata

Inilah teka silang kata yang lengkap dengan lamaran yang digunakan oleh Corey Newman.


WASHINGTON - Seorang lelaki, Corey Newman menggunakan teka silang kata sebagai satu cara unik untuk melamar kekasihnya, Marlowe Epstein, lapor sebuah akhbar semalam.
Newman yang berusia 28 tahun berpakat dengan akhbar Washington Post untuk bertanyakan soalan itu kepada Epstein, 31, menerusi satu kolum teka silang kata.
Pembayang untuk soalan nombor 51 berbunyi: Kata-kata yang mempunyai cincin padanya. Apabila Epstein menjawab dengan betul: "Adakah awak ingin berkahwin dengan saya?" Newman terus melutut dan menyerahkan sebentuk cincin permata dan mengulangi soalan sama.
Epstein yang namanya diambil daripada pembayang nama watak dalam filem Shakespeare in Love dan penulis layar filem Casablanca itu menerima lamaran tersebut.
Washington Post yang melihat lamaran tersebut sebagai satu cerita yang bagus telah merakamkan semua detik itu, sebelum memasukkan ke dalam laman webnya. - Agensi

tempe EMAS!!!!!!!!


Bahan-bahan ( 4 orang )

  • 5 keping tempe
  • 1 cawan tepung gandum
  • 1 sudu besar ketumbar
  • 3 ulas bawang putih
  • serbuk kunyit
  • sedikit garam dan air
  • BHN UTK SAMBAL KICAP
  • segengam chili padi
  • 2 ulas bawang putih
  • gula
  • kicap manis

Cara-cara

  1. Potong serong tempe nipis2 supaya rangup.
  2. Tumbuk bwg putih n ketumbar.
  3. Campurkan tepung dengan bhn tumbuk dan serbuk kunyit. Letak garam skit. Then masukkan air sedikit demi sedikit sehingga cair macam tepung nk goreng pisang.
  4. Panaskan minyak, Dah panas bleh la goreng hingga kekuningan.
  5. Utk sambal kicap - tumbuk chili,bwg putih, dan gula. Then masukkan dlm mangkuk dan bubuhlah kicap. Dah siap..bleh cicah ngan tempe goreng td...
  6. SeLaMaT MenCuBa.. 
 JOM MASAK...

Tutorials ANIM8OR 3D MODELER...

Jom gadoh lg... best ni..
Anim8or

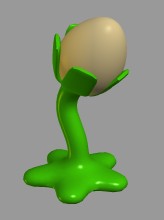
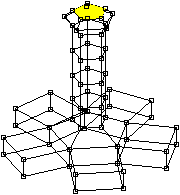
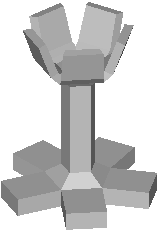
 This tutorial describes how to make an Eggplant.  It uses the technique of box modeling but starts with a pentagon instead of a cube so that it will have 5-fold symmetry. The basic idea is to model a very simple block figure that encloses the shape that  you want to make.  Then using surface subdivision and smoothing you can create smooth surfaces that follow almost any basic shape that you can imagine.  You can control the sharpness of corners so that everything doesn't end up looking like PlaySkool toys.

 
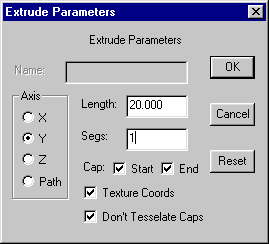
Start in the Object Editor.  Use the View->Top command to switch to the top view so that it fills the screen.  Select Build->Primitives->N-Gon from the menu and set the value to 5.  Select Add Polygon  from the toolbar, click in the center of the screen and drag about 2 squares to add a pentagon.  Now select Build->Extrude from the menu.  In the dialog, select the Y-axis, 20 units, 1 segment, cap both ends, and don't tessellate caps.


You should have a nice thick base for your plant.  If you switch to wire frame mode, you will notice that the top and bottom faces are not divided into triangles, but are left as single, 5-sided polygons.  This allows the extrusion of the base into the stem to work.

Note: If you have problems with the extrusion not working, you might not have been in the top view when you added the pentagon.

Now you'll switch to point-edit mode  where most of the work will be done.  You'll also want to switch the screen to a wireframe view which shows individual points as well for easier editing.  Use the hot-key Crtl-W or click on the wireframe button  on the top tool bar.
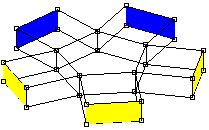
To build the "feet" of the base, you will need to select thel 5 outer faces on the base and extrude them.  Switch to face mode  and drag-select .  When you click the mouse and drag to select an area, and polygon that is entirely contained within the rectangle will be selected.  Remember that the left mouse button will deselect any previously selected areas before adding the new ones, and the right button will add to existing selections.  When you are selecting faces, it may help to switch among the ortho, top, front, etc. views to make it easier to select things.  Now select all 5 outer faces. You will notice that some faces are yellow while others are blue.  The yellow ones are facing towards the screen while the blue ones are facing the other way.  This makes it easier to see what's what in wire frame views.
Now click the face extrude  button from the lower part of the toolbar.  This is all that's needed to build the base.  Smoothing will do the rest.  You can make the base a little flatter, though, by setting the level of creasing to apply, as you'll see later.
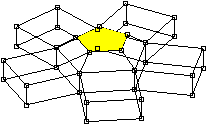
Next switch to point-select  and select the top center face.  It should appear yellow, or you got the bottom face instead.  Extrude this face up about half as much as the base is thick.  Then click the face scale  button and click and drag down anywhere within the window.  This will scale the face.  Make it about half the diameter of the original top face. 

 
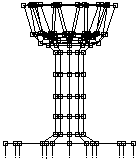
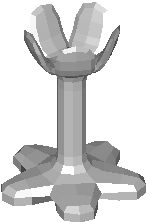
Now extrude the top pentagon up 4 or 5 times, each about as high as the base is thick.  This will form the stem.  Then extrude again, but make this one a little less that half as thick.  Scale the face out about 25%.  Extrude a bit more, and scale back to the original size.  These will form the base of the flower, and the sides of the top section will form the leaves that surround the egg.  Your model should look similar to the one at the left.
Now select the 5 surrounding upper faces.  You may need to switch between the point-select and drag-select tools, and switch views to get the right faces selected. Once you have then selected as shown on the right, extrude them a small amount, scale them up until they are close to touching, but not quite.  Then use the face rotate  tool to tilt the faces so that they are facing a little bit more vertically.  To do this, click and drag the left mouse button carefully in the vertical direction only.  Moving it to the right or left will twist the faces in the wrong direction.
Next extrude them again, this time a bit more than the previous, and rotate the faces until they are facing even more vertically.  One final extrude and you're finished with the basic shape for the eggplant!


Before you smooth your eggplant into its final form there is one more thing that you can do control the final form.  It would be better if the bottom side of the base a little flatter than the top side.  You can do this by setting how sharp the bottom edges should be. First select all of the bottom most edges.  Switch to the front view and to edge select  mode.  Drag select the bottom row of the model as shown on the left.  Then select Edit->EdgeProperties from the menu.  Select the Rounded button and enter 1 for the level.  Click OK and you're ready to smooth your model. 

 
Switch back to edit mode in the object editor mode by clicking on the topmost arrow button on the toolbar.  It is easier to see what's happening if you view your model in the faceted mode, so select the View->Preferences menu item and then select flat in the OpenGL area of the dialog that appears.  Click OK. Selet your model.  Then select the Build->Subdivide menu item.  Leave the tension value at the default 0 in the dialog that appears, and click OK.  Then do the same thing again. Your model should look like that shown below!
Notice the shape of the foot.  The bottom edge is sharper than the top, but it isn't perfectly sharp.  This gives the model a "bottom" side without going all the way to making a sharp crease, which wouldn't be very plant-like.
If you switch back to a smooth view, you might notice a few places near sharp curves where the model appears creased.  You can smooth these places out by subdividing again but this would increase the number of faces in the model by a factor of 4! A better way is to set the model's smooth angle.  The smooth angle is the threshold Anim8or uses to determine if adjacent faces should appear smooth or creased.  Switch to point-select  and double click on the model to bring up its properties dialog.  Set the smooth angle to 75 and click OK, and it's all better.


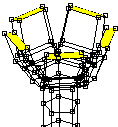
A straight stem is pretty boring.  Using a couple of modifiers can really help here.  First make sure you're in the front view.  Click on the add modifier tool , then click on the lower part of the stem and drag up about 2/3 of the way.  Select bend modifier from the dialog, and a yellow modifier grid appears.  It may not be visible if it's narrower than the stem.  If so you can either switch to wire frame, or just continue and it should become visible.
Next select the scale non uniform tool  and click and drag the left mouse button to the right until the modifier is slightly wider than the top part of your model.  Select both the model and the modifier (you can use the right mouse in point-select mode to add additional objects to the selected list) and click on Build->Modifiers->BindModifier from the menu. Double click on the modifier grid and a parameter dialog will appear.  Enter -60 for the bend angle, clock OK, and see the results!  It some parts of your plant are stretched way out of shape, it's probably because the modifier wasn't wide enough to include the whole top part of the plant.  Click on Build->Modifiers->EffectModifier and the change is permanent.
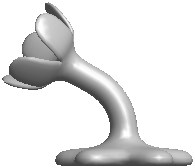
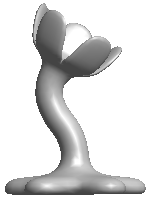
Now add another bend modifier starting up the stem a bit, and in the general direction that the stem goes, with a bend angle of about 90 degrees.  You've now finished the main part of the eggplant!

 
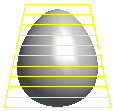
Creating the egg is easy.  Select the sphere tool  and click-drag in the window to add a sphere.  Then double-click on the sphere and set the diameter to 20 and the longitude and latitude divisions to 32 and 24.  Click OK, and then select Build->ConverToMesh from the menu.  Now your sphere is an editable mesh so you can use a modifier on it to scale the tip into more of an egg shape.  Add a taper modifier that just covers the entire sphere, bind it to the sphere, and set the taper value to about 0.4 to make an egg.

 
Now all you have to do is put them together, and pick some materials.  Rotate the egg to the right and move it into place atop the stem.  You might need to scale it up or down a bit to make it fit exactly. To add your materials, select Options->Materials from the menu to show the material panel.  Double click on the "New" material and select the stem's properties.  Then select the stem and click on the "Apply" button at the top of the material panel.  Do the same for the egg.  In the example at the left the Brilliance is set to 1.8 to make the purple deeper and richer.  This won't show up in the interactive mode, but will in the rendered views.  The Roughness is 16 and the Specular weight is 0.4, just so you know.
You might want to select both parts and stick 'em together by using the Build->Group menu command.  This way they don't get out of position relative to each other as easily as you work.


DH habis... jom gune software baru...

Illustrator & Photoshop

asalamualaikum semua... jom belaja guna Illustrator & Photoshop..
ni sye copy dr intenet je,, huhu..
sj nk kongsi ilmu same2..
jom la gadoh macam mane nk buat ni...


There are lots of ways to create swirls in Illustrator, you can even download vectors from sites such as bittbox and dezignus, and if you are using Photoshop you can download brushes with those sorts of symbols.  

However in this tutorial I will show 4 ways to create swirls, and by mixing them you will learn some very powerful techniques that will allow you to easily make tons of different styles of swirls and crazy sperm vectors.


1st Way - Arc, Circle, and Path tool

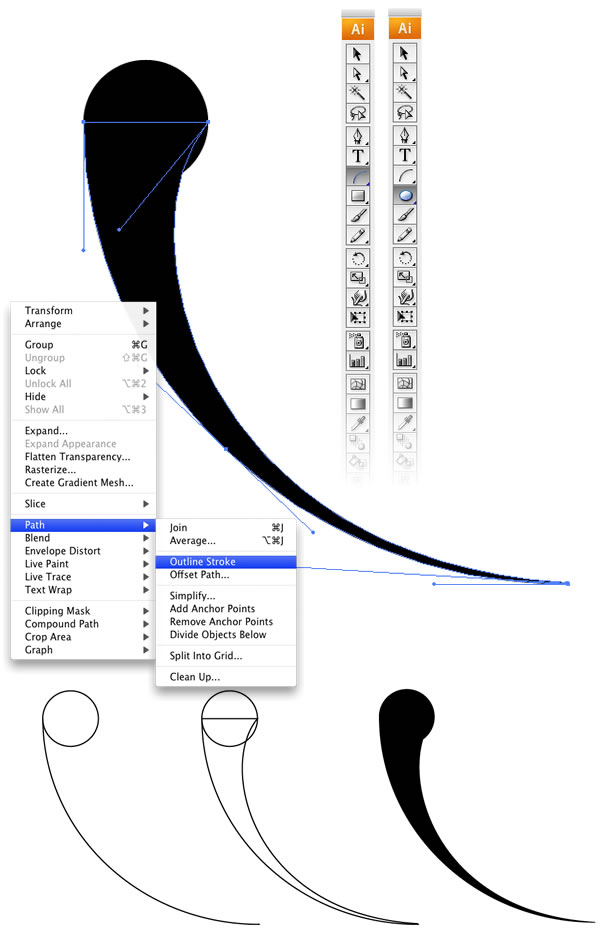
Select the Arc Tool and create an arc. You can change the arc's properties by holding the mouse button and pressing the UP and DOWN keys for the angle of the arc, SPACE to move it, and ALT to change the center point.
Now create an ellipse using the Ellipse Tool (L).
After you create the arc go to Object>Path>Outline Stroke. The stroke will be converted to a shape, the select the Direct Selection Tool(A).

2nd Way - Blend Tool(W)

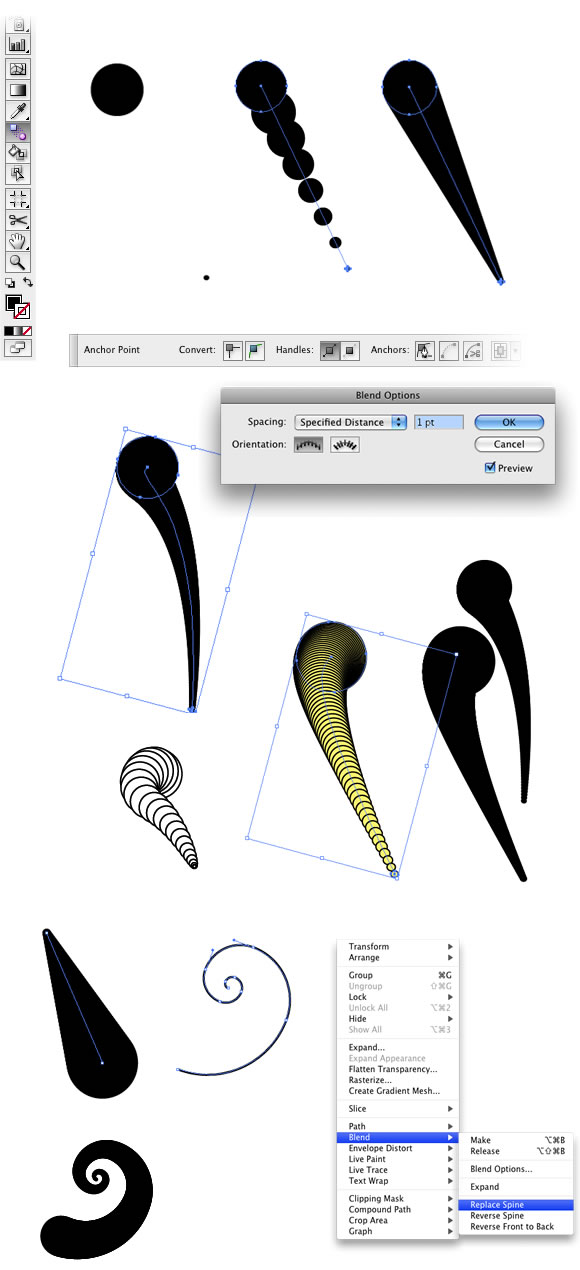
Create 2 circles, one will be the start and the other the end points of our swirl. Then select the Blend Tool (W) and click on the small circle and after that on the big circle. Double-click the Blend Tool icon to open the Blend Options, there you will be able to change the spacing of the elements and the orientation. Select Specified Distance and use 1pt, for the Orientation use Align to Path.
The spine is the path along which the steps in a blended object are aligned. By default, the spine forms a straight line.
  • To adjust the shape of the spine, drag the anchor points and path segments on the spine with the Direct Selection tool.
  • To replace the spine with a different path, draw an object to use as the new spine. Select the spine object and the blended object, and choose Object > Blend > Replace Spine.
  • To reverse the order of a blend on its spine, select the blended object and choose Object > Blend > Reverse Spine.
You can test different styles for the blend, like adding a dark stroke with some light color.

3rd Way - Spiral Tool

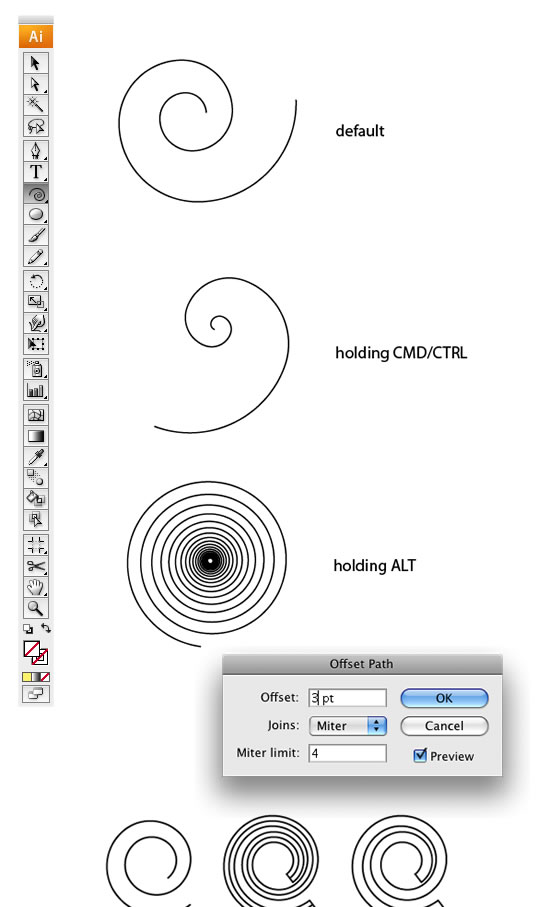
Select the Spiral Tool and create a spiral, you can change the style of the spiral by holding the mouse button and some keys like CMD/CTRL, ALT, SPACE, UP, and Down.
You can go to Object>Path>Offset Path and specify the offset to 3pt, you will create a uniform spiral. But if you want to make the start point smaller than the end or vice-versa, you can use the spiral as spine for a Blend.

4th Way - Twirl Tool

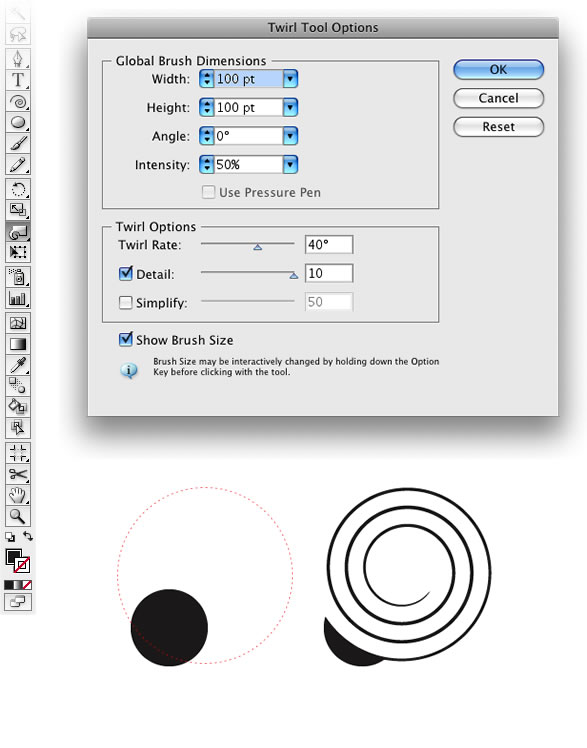
Create an ellipse with the Ellipse Tool, after that select the Twirl Tool and double click on the icon to open the Twirl Tool Options. Deselect the Simplify option and use 10 for detail. Then go with the center of the twirl tool over the edge of the circle and press and hold the mouse button to create a spiral.

Mixing Techniques

Step 1

Create the first swirl using the first technique. Use a very long line with a circle at the end.

Step 2

Duplicate the swirls and resize it, repeat that to create another one, so you will have 3 swirls.

Step 3

Create a spiral applying the 3rd or 4th technique, actually you can do that with blends too.

Step 4

Create another swirl this time make the circle or much bigger.
 

Step 5

Duplicate the new swirl, resize and make it a bit smaller than the other like the image below.

Step 6

Duplicate again the swirl, now go to Object>Transform>Reflect. Change the color to yellow.

Step 7

Create a new spiral like the image below, then duplicate it again resize it like and place it above the other spiral.

Step 8

Keep adding swirls.

Step 9

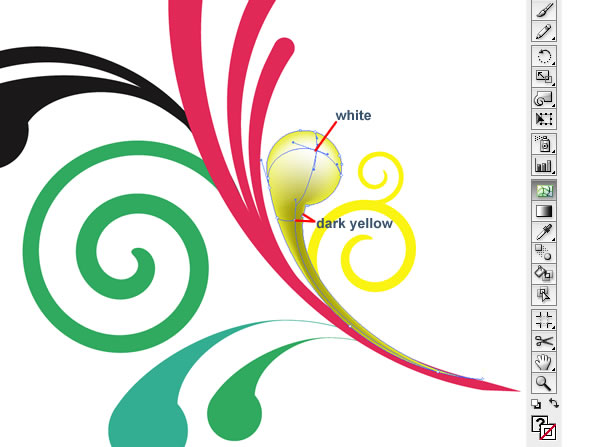
Now we will add some 3D effects using the Mesh Tool (U). This tool allows us to apply multiple gradients to one object. Just select the object then with the Mesh Tool click where you want to add a new color.
Here in our swirl we will create a highlight area and a dark area. Repeat the process to the other swirls.

Step 10

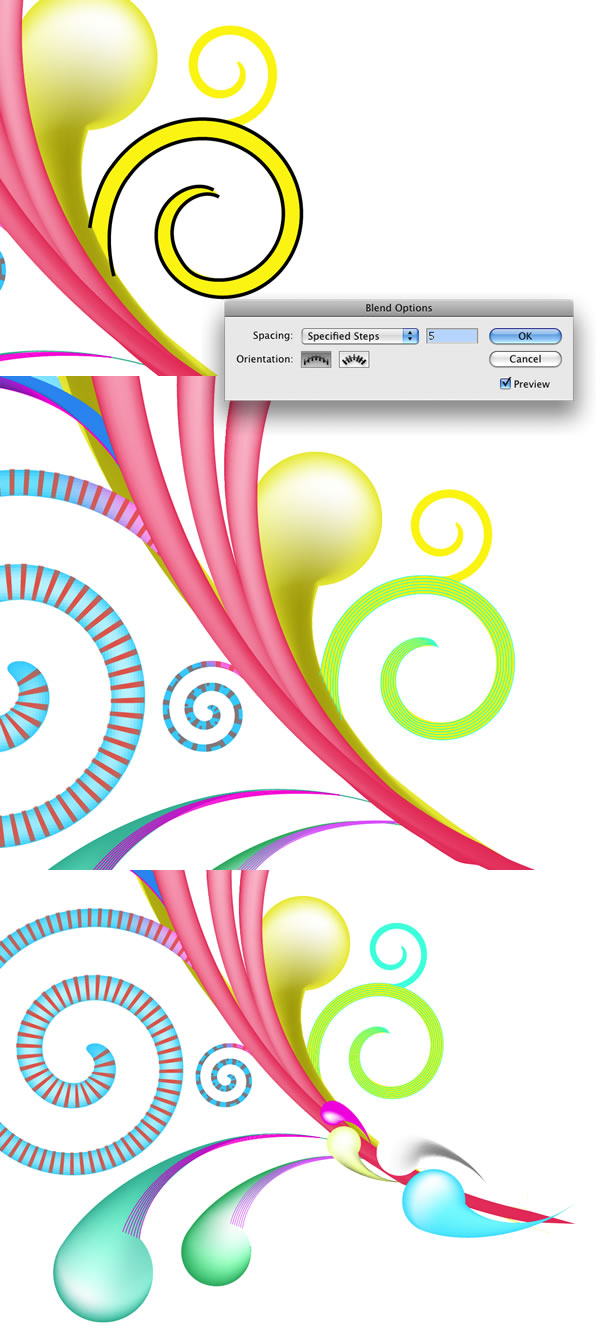
With the Pen Tool create two lines following the shape of the tail of our "sperm" shape, then apply the Blend Tool with 5 Specified Steps. After that duplicate and resize the blend and use it on the other swirl

Step 11

Add more shapes and apply the Mesh Tool. Duplicate the yellow swirl and make it really bigger like the image below.

Step 12

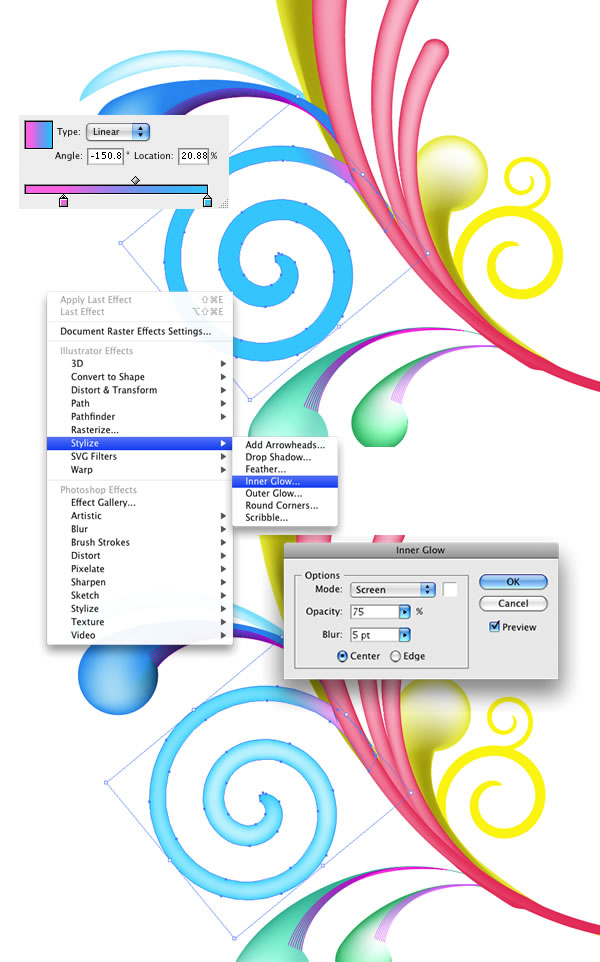
For the spiral add a gradient from pink to cyan, then go to Effect>Stylize>Inner Glow... Use Screen for the Mode, 75% Opacity, 5pt Blur and Center.

Step 13

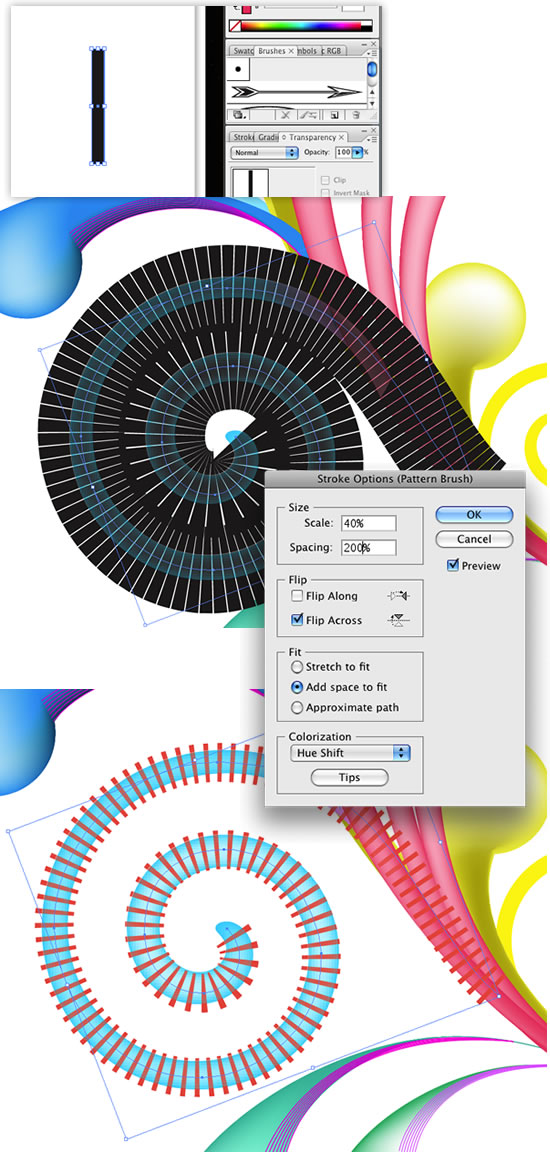
For those stripes following the spiral we will create a brush. To do that is really simple in Illustrator. Just create a rectangle and drag and drop it in the Brushes Palette, then in this case select New Pattern Brush. Use the image below for reference.
After that create a spiral exactly like the one you want to add the stripes, and apply the brush.

Step 14

Select the spiral without the Brush Stroke and copy it. Then select the spiral with the stroke and go to the Transparency Palette (Window>Transparency). Double click the area next to the thumbnail, it will create a new thumb all black, select this thumb and paste the spiral. It will create a mask, just move the mast to align it with the original spiral. It looks complicated but it's easier than the explanation ;)

Step 15

Use the blend tool to add more elements and details to some shapes.

Step 16

Create more swirls using the techniques we've seen before and just change the sizes and colors. After that group all swirls.

End result in Illustrator.

Step 17 (Photoshop)

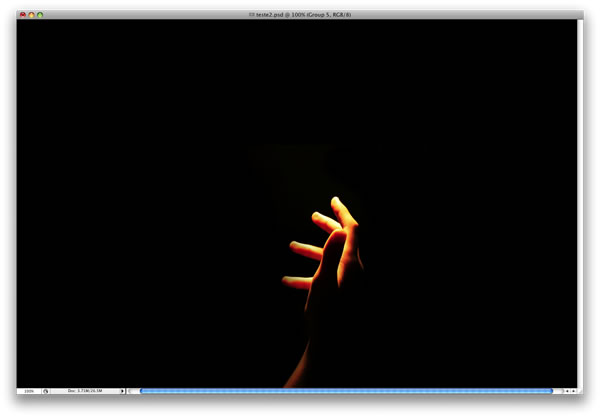
Create a new document and place your image, I used a photo from http://sxc.hu and 1440x900px for the document size.

Step 18

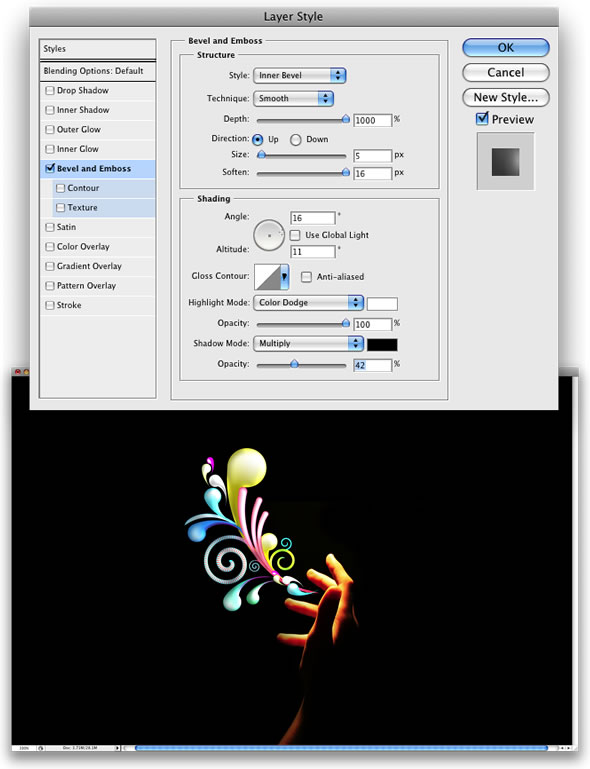
Copy the swirls in illustrator, the group with all swirls we have created, and paste it in Photoshop. Select Paste As Smart Objects. After that go to Layer>Layer Style>Bevel and Emboss, use the image below for reference.

Step 19

Duplicate the layer and go to Edit>Transform>Flip Vertical, and reduce the size of the layer and move it like the image below. After that select the 2 layers and convert them to Smart Objects and rename it to "Swirls"

Step 20

Duplicate the new "Swirls" and rename it to "Swirls Glow", then go to Filter>Blur>Gaussian Blur, use 3px for the Amount, place it behind the "Swirls" and change the Blend Mode to Hard Light

Step 21

Duplicate the "Swirls" layer again and go to Edit>Transform>Flip Horizontal, again reduce its size and move it like the image below. Then go to Filter>Blur>Gaussian Blur, use 3px for the amount again, but don't change the blend mode.

Step 22

Duplicate the "Swirls" layer one more time and this time just rotate it like the image below. Then go again to Filter>Blur>Gaussian Blur, however this time use 5.5px for the Amount and reduce the opacity to 70%

Conclusion

Just place your logo and that's it. You can add more elements, you can even copy and paste each element separately and apply different layer styles to each swirl. There are many options and tons of different results from these methods, now it's all about trying different combinations.


habis dh, ape lg jom la buat... klw x jd cube lg.. huhu..
cayok2... =)

Write here, about you and your blog.
 
Copyright 2009 FiKirKan!!! All rights reserved.
Free Blogger Templates by DeluxeTemplates.net
Wordpress Theme by EZwpthemes