Jom gadoh lg... best ni..
Anim8or
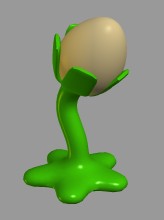 | | This tutorial describes how to make an Eggplant. It uses the technique of box modeling but starts with a pentagon instead of a cube so that it will have 5-fold symmetry. The basic idea is to model a very simple block figure that encloses the shape that you want to make. Then using surface subdivision and smoothing you can create smooth surfaces that follow almost any basic shape that you can imagine. You can control the sharpness of corners so that everything doesn't end up looking like PlaySkool toys.
|
Start in the Object Editor. Use the View->Top command to switch to the top view so that it fills the screen. Select Build->Primitives->N-Gon from the menu and set the value to 5. Select Add Polygon  from the toolbar, click in the center of the screen and drag about 2 squares to add a pentagon. Now select Build->Extrude from the menu. In the dialog, select the Y-axis, 20 units, 1 segment, cap both ends, and don't tessellate caps. from the toolbar, click in the center of the screen and drag about 2 squares to add a pentagon. Now select Build->Extrude from the menu. In the dialog, select the Y-axis, 20 units, 1 segment, cap both ends, and don't tessellate caps. | 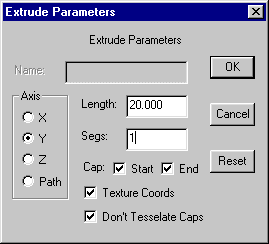 |

 | You should have a nice thick base for your plant. If you switch to wire frame mode, you will notice that the top and bottom faces are not divided into triangles, but are left as single, 5-sided polygons. This allows the extrusion of the base into the stem to work.
Note: If you have problems with the extrusion not working, you might not have been in the top view when you added the pentagon.
Now you'll switch to point-edit mode  where most of the work will be done. You'll also want to switch the screen to a wireframe view which shows individual points as well for easier editing. Use the hot-key Crtl-W or click on the wireframe button where most of the work will be done. You'll also want to switch the screen to a wireframe view which shows individual points as well for easier editing. Use the hot-key Crtl-W or click on the wireframe button  on the top tool bar. on the top tool bar.
|
To build the "feet" of the base, you will need to select thel 5 outer faces on the base and extrude them. Switch to face mode  and drag-select and drag-select  . When you click the mouse and drag to select an area, and polygon that is entirely contained within the rectangle will be selected. Remember that the left mouse button will deselect any previously selected areas before adding the new ones, and the right button will add to existing selections. When you are selecting faces, it may help to switch among the ortho, top, front, etc. views to make it easier to select things. Now select all 5 outer faces. You will notice that some faces are yellow while others are blue. The yellow ones are facing towards the screen while the blue ones are facing the other way. This makes it easier to see what's what in wire frame views. . When you click the mouse and drag to select an area, and polygon that is entirely contained within the rectangle will be selected. Remember that the left mouse button will deselect any previously selected areas before adding the new ones, and the right button will add to existing selections. When you are selecting faces, it may help to switch among the ortho, top, front, etc. views to make it easier to select things. Now select all 5 outer faces. You will notice that some faces are yellow while others are blue. The yellow ones are facing towards the screen while the blue ones are facing the other way. This makes it easier to see what's what in wire frame views.
|  |
Now click the face extrude  button from the lower part of the toolbar. This is all that's needed to build the base. Smoothing will do the rest. You can make the base a little flatter, though, by setting the level of creasing to apply, as you'll see later. button from the lower part of the toolbar. This is all that's needed to build the base. Smoothing will do the rest. You can make the base a little flatter, though, by setting the level of creasing to apply, as you'll see later. | 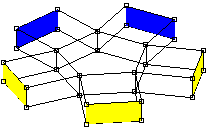 |
Next switch to point-select  and select the top center face. It should appear yellow, or you got the bottom face instead. Extrude this face up about half as much as the base is thick. Then click the face scale and select the top center face. It should appear yellow, or you got the bottom face instead. Extrude this face up about half as much as the base is thick. Then click the face scale  button and click and drag down anywhere within the window. This will scale the face. Make it about half the diameter of the original top face. button and click and drag down anywhere within the window. This will scale the face. Make it about half the diameter of the original top face. | 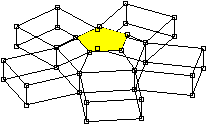 |
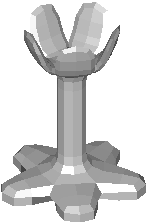
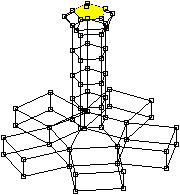 | Now extrude the top pentagon up 4 or 5 times, each about as high as the base is thick. This will form the stem. Then extrude again, but make this one a little less that half as thick. Scale the face out about 25%. Extrude a bit more, and scale back to the original size. These will form the base of the flower, and the sides of the top section will form the leaves that surround the egg. Your model should look similar to the one at the left. |
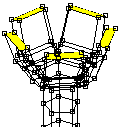
Now select the 5 surrounding upper faces. You may need to switch between the point-select and drag-select tools, and switch views to get the right faces selected. Once you have then selected as shown on the right, extrude them a small amount, scale them up until they are close to touching, but not quite. Then use the face rotate  tool to tilt the faces so that they are facing a little bit more vertically. To do this, click and drag the left mouse button carefully in the vertical direction only. Moving it to the right or left will twist the faces in the wrong direction. tool to tilt the faces so that they are facing a little bit more vertically. To do this, click and drag the left mouse button carefully in the vertical direction only. Moving it to the right or left will twist the faces in the wrong direction.
Next extrude them again, this time a bit more than the previous, and rotate the faces until they are facing even more vertically. One final extrude and you're finished with the basic shape for the eggplant!
| 

 |
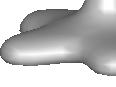
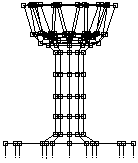 | Before you smooth your eggplant into its final form there is one more thing that you can do control the final form. It would be better if the bottom side of the base a little flatter than the top side. You can do this by setting how sharp the bottom edges should be. First select all of the bottom most edges. Switch to the front view and to edge select  mode. Drag select the bottom row of the model as shown on the left. Then select Edit->EdgeProperties from the menu. Select the Rounded button and enter 1 for the level. Click OK and you're ready to smooth your model. mode. Drag select the bottom row of the model as shown on the left. Then select Edit->EdgeProperties from the menu. Select the Rounded button and enter 1 for the level. Click OK and you're ready to smooth your model.
|
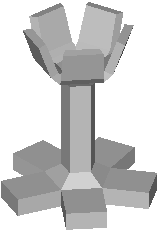
Switch back to edit mode in the object editor mode by clicking on the topmost arrow button on the toolbar. It is easier to see what's happening if you view your model in the faceted mode, so select the View->Preferences menu item and then select flat in the OpenGL area of the dialog that appears. Click OK. Selet your model. Then select the Build->Subdivide menu item. Leave the tension value at the default 0 in the dialog that appears, and click OK. Then do the same thing again. Your model should look like that shown below!
|

| Notice the shape of the foot. The bottom edge is sharper than the top, but it isn't perfectly sharp. This gives the model a "bottom" side without going all the way to making a sharp crease, which wouldn't be very plant-like. |
|
If you switch back to a smooth view, you might notice a few places near sharp curves where the model appears creased. You can smooth these places out by subdividing again but this would increase the number of faces in the model by a factor of 4! A better way is to set the model's smooth angle. The smooth angle is the threshold Anim8or uses to determine if adjacent faces should appear smooth or creased. Switch to point-select and double click on the model to bring up its properties dialog. Set the smooth angle to 75 and click OK, and it's all better.
| 
 |

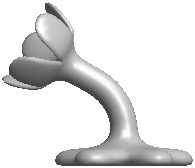
 | A straight stem is pretty boring. Using a couple of modifiers can really help here. First make sure you're in the front view. Click on the add modifier tool  , then click on the lower part of the stem and drag up about 2/3 of the way. Select bend modifier from the dialog, and a yellow modifier grid appears. It may not be visible if it's narrower than the stem. If so you can either switch to wire frame, or just continue and it should become visible. , then click on the lower part of the stem and drag up about 2/3 of the way. Select bend modifier from the dialog, and a yellow modifier grid appears. It may not be visible if it's narrower than the stem. If so you can either switch to wire frame, or just continue and it should become visible.
Next select the scale non uniform tool  and click and drag the left mouse button to the right until the modifier is slightly wider than the top part of your model. Select both the model and the modifier (you can use the right mouse in point-select mode to add additional objects to the selected list) and click on Build->Modifiers->BindModifier from the menu. Double click on the modifier grid and a parameter dialog will appear. Enter -60 for the bend angle, clock OK, and see the results! It some parts of your plant are stretched way out of shape, it's probably because the modifier wasn't wide enough to include the whole top part of the plant. Click on Build->Modifiers->EffectModifier and the change is permanent. and click and drag the left mouse button to the right until the modifier is slightly wider than the top part of your model. Select both the model and the modifier (you can use the right mouse in point-select mode to add additional objects to the selected list) and click on Build->Modifiers->BindModifier from the menu. Double click on the modifier grid and a parameter dialog will appear. Enter -60 for the bend angle, clock OK, and see the results! It some parts of your plant are stretched way out of shape, it's probably because the modifier wasn't wide enough to include the whole top part of the plant. Click on Build->Modifiers->EffectModifier and the change is permanent.
Now add another bend modifier starting up the stem a bit, and in the general direction that the stem goes, with a bend angle of about 90 degrees. You've now finished the main part of the eggplant!
|
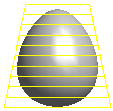
Creating the egg is easy. Select the sphere tool  and click-drag in the window to add a sphere. Then double-click on the sphere and set the diameter to 20 and the longitude and latitude divisions to 32 and 24. Click OK, and then select Build->ConverToMesh from the menu. Now your sphere is an editable mesh so you can use a modifier on it to scale the tip into more of an egg shape. Add a taper modifier that just covers the entire sphere, bind it to the sphere, and set the taper value to about 0.4 to make an egg. and click-drag in the window to add a sphere. Then double-click on the sphere and set the diameter to 20 and the longitude and latitude divisions to 32 and 24. Click OK, and then select Build->ConverToMesh from the menu. Now your sphere is an editable mesh so you can use a modifier on it to scale the tip into more of an egg shape. Add a taper modifier that just covers the entire sphere, bind it to the sphere, and set the taper value to about 0.4 to make an egg.
|  |
 | Now all you have to do is put them together, and pick some materials. Rotate the egg to the right and move it into place atop the stem. You might need to scale it up or down a bit to make it fit exactly. To add your materials, select Options->Materials from the menu to show the material panel. Double click on the "New" material and select the stem's properties. Then select the stem and click on the "Apply" button at the top of the material panel. Do the same for the egg. In the example at the left the Brilliance is set to 1.8 to make the purple deeper and richer. This won't show up in the interactive mode, but will in the rendered views. The Roughness is 16 and the Specular weight is 0.4, just so you know.
You might want to select both parts and stick 'em together by using the Build->Group menu command. This way they don't get out of position relative to each other as easily as you work.
DH habis... jom gune software baru... |


0 comments:
Post a Comment